This is the fourth in a series of articles on our “Home Office Challenges App (HOCA)”. It offers an introduction to Kubernetes and describes its installation and integration with GitLab. The next article will go into more detail and describe some of the challenges we faced.
What is Kubernetes
Kubernetes is a platform for working with containerized software.
Containerized software packages code and various dependencies into so-called containers. Those containers run the same in every environment, so the developers do not have to release different versions for each system that the application should run on. The most common container platform is Docker, which we also used for our project.
Once we have created such containers from our software, Kubernetes then helps us deploy and manage those containers. It is especially useful for the scaling of applications. Whether we only need to run one container to serve a small number of users, or billions of them, Kubernetes allows us to do that with only few adjustments.
Next, we will have a look at the most important building blocks of Kubernetes.
Building Blocks of Kubernetes
Cluster
A cluster is a set of machines, so-called nodes, on which our containers are run.
Pods
Pods are the smallest execution unit in Kubernetes. A pod can contain one or more containers, which all have access to a shared context, including a shared storage. Each pod also has a unique id. Usually, pods are not created directly, but indirectly by Deployments or other workload resources. Kubernetes allows us to view the status and health of all pods in the cluster at all times.
Deployments
Deployments are a way to describe the desired state of the cluster. We can tell Kubernetes which pods we want by specifying the images/containers they should use, and how many instances (replicas) of the pod should be running at the same time. We can also set an update strategy. As long as the deployment is running, Kubernetes will make sure that the actual state of the cluster matches the desired state of the Deployment, e.g. by creating pods to match the required number.
Services
Since Pods are created and destroyed dynamically, Kubernetes has to make sure that this does not cause any problems to those who access these pods. Here, services come into play. A service acts as an intermediary between pods and their users, so that loose coupling is ensured. The pods belonging to a service are identified by a common label. Every service has its own IP address. Some are only available from within a cluster (internal services), while others can be accessed from anywhere (external services).
Stateful Sets
They are similar to deployments, with one important differentiation: They require pods to have a unique identity (hostname). This can be useful when a stable and persistent storage is needed.
SETTING UP KUBERNETES ON WINDOWS 10
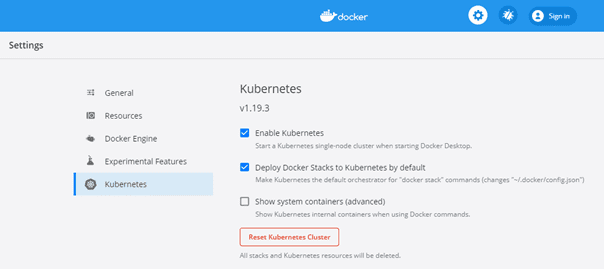
For Windows users, it is best to use the standalone Kubernetes server that comes along with Docker Desktop. Just go to the Docker Desktop settings and click on “Enable Kubernetes” in the “Kubernetes” tab. If you have WSL2 (Windows Subsystem for Linux) installed, you can enable it in the “General” tab as well to improve performance.
After the installation has successfully completed, there should be a functioning Kubernetes cluster running on your system with at least one node. If you enter the following command in a CLI of your choice, you should see one node named “docker-desktop”:
kubectl get nodes
Kubernetes Dashboard
As a next step, you can install the Kubernetes Web UI (Dashboard) to monitor your application. The dashboard is not deployed by default, so it needs to be deployed with the following command:
kubectl apply -f <a href="https://raw.githubusercontent.com/kubernetes/dashboard/v2.0.0/aio/deploy/recommended.yaml">https://raw.githubusercontent.com/kubernetes/dashboard/v2.0.0/aio/deploy/recommended.yaml</a> After the dashboard is deployed, we need to run this command to make it available:
kubectl proxyThe Web UI can now be accessed at the following URL:
http://localhost:8001/api/v1/namespaces/kubernetes-dashboard/services/https:kubernetes-dashboard:/proxy/
Before we can start using the dashboard, we need to generate an authentication token. The process for doing this can be found in the following article.
When you have successfully authenticated yourself with the token, you can now use the dashboard to monitor and manage your cluster. Two very useful features can be found in the “Pods” view. By clicking on the three dots next to a Pod, you can view its log files, or delete it. Deleting a pod is necessary if you want to update the application with your latest code changes. The Pod is then re-created automatically with the current Docker image.
DEPLOYING TO THE CLUSTER
To normal process for deploying to a Kubernetes cluster involves two steps:
- Create a YAML file which defines the desired state, e.g. which Docker image your pods should use or how many replicas you want
- Tell Kubernetes to use that file with the command kubectl apply -f <filename>
You can find a more thorough walkthrough of these steps on the Kubernetes website.
If everything worked, you can go to the Kubernetes Dashboard and see that the new Deployment is up and running. There, you will also find the pods that belong to the Deployment.
GITLAB PIPELINE
GitLab isn’t just a Git Repository, it also provides various helpful DevOps functionalities, so that it can be used to handle Continuous Integration, Delivery and Deployment for us. This is done with the help of CI/CD Pipelines.
To set up a pipeline, just add a file named .gitlab-ci.yml to the root folder of your repository and commit/push the change. This will automatically trigger the start of a pipeline.
The .gitlab-ci.yml file is divided into Jobs and Stages. Jobs contain the actions that the Pipeline should take, while Stages are used to describe when and in which order the Jobs should run. Each stage contains one or multiple jobs, which then contain one or multiple shell scripts. The use of variables, conditional logic, and various other helpful features, is also supported.
GITLAB RUNNER
A GitLab runner is an agent which runs all the jobs in a given pipeline and sends the results back to the GitLab instance. Runners can be shared by all groups and projects of a GitLab instance or belong to specific groups or projects.
On gitlab.com, free users who employ the shared runners can run out of build minutes fast, so it is recommended for them to enable specific runners for their projects.
GITLAB ENVIRONMENTS
When the pipeline has successfully tested and built our code, it’s time to deploy it. Sometimes, one deployment location is enough, but software projects usually include multiple environments, e.g. Development, Staging, Production. When we add a new job to the .gitlab-ci.yml file, we can specify which environment we are using and supply the URL for this environment, so that everything is deployed to the right place.
It is also possible to generate the deployment URL dynamically. This can be very helpful if we want to deploy the builds of each branch to a separate URL. For this purpose, we can make use of the variable $COMMIT_BRANCH.
In the next article, we will discuss several more advanced features of Kubernetes, as well as the process for deploying our “Home Office Challenges App” to the Google Cloud Platform.
Stay tuned!


