This is the fifth in a series of articles on our “Home Office Challenges App (HOCA)”. It describes various advanced functionalities of Kubernetes, including its integration with the Google Cloud Platform and the usage of Helm.
Google Cloud Platform
With the Google Cloud Platform (gcp), Google provides us with a large number of cloud computing services, only few of which we are using for our application. One of those is the Kubernetes Engine, with which we deploy our cluster. Another is the Container Registry with which we manage our Docker images.
IAM
Identity and Access Management (IAM) is a tool for centralized management of identities and access rights which can be used for various systems and applications. In our case, we will use it for the Google Cloud Platform.
First, we have to create service accounts for the access to the Kubernetes Engine and the Container Registry. Then, we store the login credentials in a variable called GOOGLE_CLOUD_ACCOUNT in GitLab (Settings -> CI/CD -> Variables). These can then be used in the Build Pipeline to authenticate us with Google.
Google CLI (gcloud)
The gcloud CLI allows us to communicate with Google Cloud. After the installation is done, we can easily configure it with the following command:
gcloud init This will open a browser window which lets us authenticate ourselves with Google. When successful, all information which is necessary for us to connect to Google Cloud will be fetched. A context for kubectl is automatically created, so that we can start deploying applications to our cluster at once.
In our GitLab build pipeline, we do not have the possibility to interact with the browser. Instead, we created a separate build image which includes everything that we need. Here are the corresponding contents of our Dockerfile:
FROM dtzar/helm-kubectl:3.3.4

RUN mkdir -p /gcloud \
    && chmod g+rwx /gcloud
WORKDIR /gcloud

COPY delete_images.sh /gcloud
COPY init_gcloud.sh /gcloud

RUN   apk add --update --no-cache curl py-pip jq \
   && apk add --update make ca-certificates openssl \
   && update-ca-certificates \
   && wget https://dl.google.com/dl/cloudsdk/release/google-cloud-sdk.tar.gz \
   && tar zxvf google-cloud-sdk.tar.gz && ./google-cloud-sdk/install.sh --usage-reporting=false --path-update=true \
   && /gcloud/google-cloud-sdk/bin/gcloud --quiet components update

CMD bash
Finally, we need to add a variable named GOOGLE_CLOUD_ACCOUNT to GitLab. It contains the authentication data in the form of a JSON key file. We reference that image as a base image in the build pipeline.
When this is done, we can use the following command to start the initialization:
/gcloud/init_gcloud.sh $PROJECT_NAME $CLUSTER_NAME $REGION Now we can communicate with the Google Cloud Platform.
Logging in the Cloud
During local development, we mostly use the Kubernetes Dashboard to view the log entries of specific pods. As previously mentioned, this dashboard isn’t pre-installed in Google Cloud by default, and Google advises against installing it.
Instead, Google provides us with its own Web UI called Cloud Console Dashboards, which allows us to use all the features that we already know from the Kubernetes Dashboard.
When we click on Workloads, we see a list of all pods currently running in the cluster:
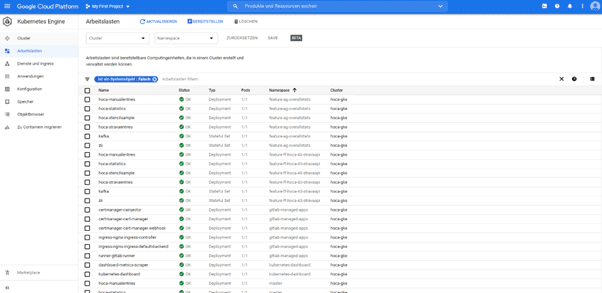
With a click on one of the pods, we can display additional information on that pod and view its log entries.
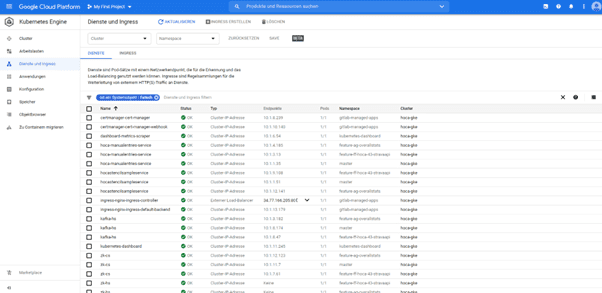
Under Services and Ingress we can see all services as well as the Ingress rules which we have defined:
That should be more than enough to find critical errors in a short time. Those of you who have deep interest in Monitoring of Kubernetes Clusters should take a look at Prometheus. Furthermore it provides great configuration options in combination with GitLab.
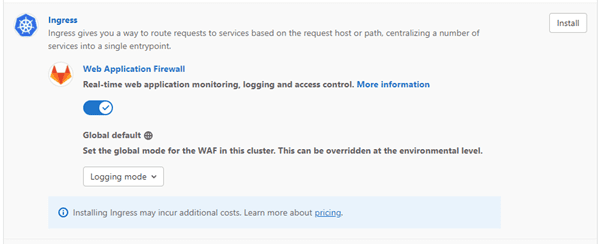
Ingress
As we already mentioned, we have decided to run our Kubernetes Cluster in the Cloud. This has many advantages, e.g. high availability and access to good documentation and a big support community. But there’s one drawback: it’s not for free. You have to pay extra for almost everything, e.g. for IP addresses. Here’s where Ingress comes into play.
With Ingress, you only need to supply one single IP address (which needs to be externally accessible) to be able to access everything inside the cluster. Basically, Ingress acts like a router which forwards incoming requests to its pods according to pre-defined rules. Furthermore, Ingress offers additional features like load balancing, SSL encryption, and name-based virtual hosting.
Like any other component, Ingress can be easily deployed in the Kubernetes Cluster. In combination with GitLab, deployment becomes even easier. After you have connected your Kubernetes Cluster with a GitLab Repository, go to Operations -> Kubernetes -> Select Cluster -> Applications. Then click on Install to install an Ingress Controller.
We defined our Ingress rules according to our subdomains. For this, we reserved the wildcard domain hoca-v7.ddns.net and configured it so that it points to the IP address of the Ingress Controller.
Here is an example configuration to make the Frontend of the master branch accessible:
apiVersion: networking.k8s.io/v1beta1
kind: Ingress
metadata:
  name: hoca-ingress
  annotations:
    kubernetes.io/ingress.class: "nginx"
spec:
  rules:
    - host: master.hoca-v7.ddns.net
      http:
        paths:
        - backend:
            serviceName: frontendService
            servicePort: 80
The deployment takes place in the namespace of the master branch. Ingress takes care of the rest. Whenever a request is made to the domain master.hoca-v7.ddns.net, the controller knows that it needs to redirect the request to the Frontend of the master branch.
Cert-Manager
Another very useful component is the Cert-Manager. It handles the management of SSL certificates, that it is possible to establish a secure connection to our application. Like Ingress, Cert-Manager can be installed with just one click using the GitLab UI:
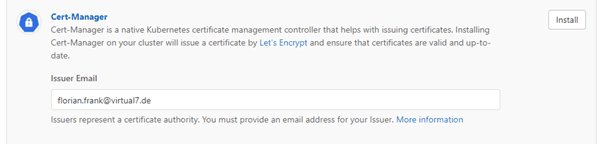
The simplest way to get a valid certificate for our domain is to use Letsencrypt. In order to do so, we must first define an Issuer to which the certificate is assigned:
apiVersion: cert-manager.io/v1alpha2
kind: Issuer
metadata:
  name: letsencrypt-staging
spec:
  acme:
    <em># The ACME server URL</em>
<em>    </em>server: https://acme-staging-v02.api.letsencrypt.org/directory
    <em># Email address used for ACME registration</em>
<em>    </em>email: florian.frank@virtual7.de
    <em># Name of a secret used to store the ACME account private key</em>
<em>    </em>privateKeySecretRef:
      name: letsencrypt-staging
    <em># Enable the HTTP-01 challenge provider</em>
<em>    </em>solvers:
      - http01:
          ingress:
            class: nginx
With this configuration, Cert-Manager can request a certificate from Letsencrypt’s ACME server. Afterwards, it is saved inside of a secret named letsencrypt. The only thing that is still missing is the information for which domain the certificate should be issued. So therefore, we have to adjust the Ingress rule configuration a little bit:
apiVersion: networking.k8s.io/v1beta1
kind: Ingress
metadata:
  name: hoca-ingress
  annotations:
    kubernetes.io/ingress.class: "nginx"
    certmanager.k8s.io/issuer: "letsencrypt-staging"
spec:
  tls:
    - hosts:
        - master.hoca-v7.ddns.net
      secretName: wildcard-hoca-v7-tls
  rules:
    - host: master.hoca-v7.ddns.net
      http:
        paths:
        - backend:
            serviceName: hocastencilsampleservice
            servicePort: 80
Now, we have everything we need for the fully automatic issuing of certificates for our application.
Helm
Helm helps us with the management of our Kubernetes Cluster. Where we previously had to deploy individual configurations with the command
kubectl apply -f <filename>.yaml we can now define whole deployments within so-called Helm Charts. Every new deployment receives its own version number, which allows us to jump back to previous versions with little difficulty. In order to use Helm, we first need to install the Helm CLI.
A Helm Chart consists of at least one file named Chart.yaml, containing the chart’s metadata, and a directory templates, which contains the various configurations which we would like to deploy.
A very useful feature of Helm are configurable variables. These are declared and defined in the file values.yaml. In our cases, we are using two separate files for local and cloud deployment, named values_local.yaml and values_web.yaml.
One difference between these files is the Image Pull Policy: On our development machines, we want the images loaded from the Local Docker Registry, so we set the value to Never. In the cloud, we want the image to be pulled from the Cloud Registry, so we use Always instead.
…
frontend:
  image: v7-hoca/stencilsample
  tag: latest
  image_pull_policy: Never
…
values_local.yaml
…
frontend:
  image: SetFromCli
  tag: SetFromCli
  image_pull_policy: Always
…
values_web.yaml
 apiVersion: apps/v1
 kind: Deployment
 metadata:
   name: hoca-stencilsample
   labels:
     app: hocastencilsample
 spec:
   selector:
     matchLabels:
       app: hocastencilsample
   replicas: 1
   strategy:
     type: RollingUpdate
   template:
     metadata:
       labels:
         app: hocastencilsample
     spec:
       containers:
         - name: stencilsample
           image: {{ .Values.frontend.image }}:{{ .Values.frontend.tag }}
           imagePullPolicy: {{ .Values.frontend.image_pull_policy }}
           ports:
             - containerPort: 80
               name: http-server
templates/deployment-frontend.yaml
Values can be overwritten using the CLI. For example, the image name and the image tag are dynamically assembled in the build pipeline and afterwards handed to the Helm Chart during deployment.
The command for the complete cloud deployment looks like this:
helm upgrade --install hoca -f values_web.yaml . --set frontend.image=$DYNAMIC_IMAGE_NAME,frontend.tag=$IMAGE_TAG --namespace $KUBE_NAMESPACE --create-namespace With “upgrade”, we tell Helm that we want to upgrade an already existing deployment named hoca. If no such deployment exists, “—install” prompts its creation. With “-f”, we specify the file containing the variables. With “.”, we tell Helm that we are currently in the same directory as the Helm Chart. Using “—set” and we can once again overwrite the variables with new values. “—namespace” defines the Kubernetes Namespace, inside of which we would like to deploy. Finally, “—create-namespace” will create the Namespace if it doesn’t already exist.
To detect errors in the configuration, we can use the following command to display the generated deployment with the inserted variable values:
helm template -f values_local.yamlBuild Optimizations (Needs, Cache, Dependencies, Dedicated Docker Image)
Now the pipeline is running stably and without further problems, but there are still a few things which can be optimized.
Needs
With the needs keyword, we can tell a job to start before the previous stage has been fully completed. One example where this can be useful is Unit Tests. Unit Tests for the Frontend do not need to wait until the build stage of the Backend is finished.
…
test-frontend:
  stage: test
  image: node:12
  needs: [ "build-frontend" ]
  script:
…
Dependencies
By default, all artifacts are passed down from one job to the next. With the keyword dependencies, we can specify exactly which artifacts should be loaded, which reduces unnecessary loading times during the build. For example, we only need the code of the Frontend to create the Frontend image.
…
create-frontend-image:
  stage: create-image
  needs: [ "build-frontend" ]
  dependencies:
    - build-frontend
…
Cache
It is possible to configure a cache for the whole pipeline, e.g. to cache dependencies like the node_modules folder. In combination with “npm ci” (instead of “npm i”), our pipeline will be sped up further.
…
create-frontend-image:
  stage: create-image
  needs: [ "build-frontend" ]
  dependencies:
    - build-frontend
  cache:
    paths:
      - frontend/sample/node_modules
  script:
…
Additional options to optimize the cache can be found here.
Dedicated Docker Image
If our pipeline contains multiple jobs which make use of the same tools/CLIs, we should create an image for this purpose (if we haven’t already done so). Using this image will prevent lots of duplicate code and reduce the time spent on downloading tools. This is what we did in the chapter “Google CLI(gcloud)” for helm, kubectl, and gcloud.
Service Env variables
For communicating between several applications in your cluster the previously described services are used. Each application uses the service of another application to communicate with it rather than communicate directly with the other application.
One way to do this is via environment variables. When creating a new service, kubelet automatically adds a set of environment variables which can be used in other pods.
For example, we have configured a service called kafja-hs. When this service runs in our Kubernetes cluster, we can use KAFKA_HS_PORT as an environment variable in our spring application so that our producers and consumers can communicate with Kafka.
kafka.broker.url=KAFKA_HS_PORT application.properties
This variable provides us with the complete internal address including protocol, host and port. There are other variables containing e.g. only the host or only the port, so you are very flexible here.
An important thing to note is that your application pod has to start after the service, otherwise the environment variables will not be available yet.
In the next article, we will introduce StencilJS and describe how we used it for our “Home Office Challenges App”.
Stay tuned!


